Sports Health

Running Mechanics Part II: Top 5 Mechanical Faults

IMG_7727.JPG

Top 5 Mechanical Running Faults

In my last post we discussed some running gait pattern norms. Once again, it is difficult to completely standardize running gait however researchers have been able to set a range of “optimal” angles and loads through extensive observation on runners with and without pain.  So now we know that anything deviates TOO MUCH from the closest thing to a standard can produce future problems.  For clinicians who want to analyze gait a few recommendation for you would be: educate yourself on running gait normal and abnormal patterns, and strongly consider observing running gait in slow motion or use some of gait analysis system. It is really difficult to see under the naked eye unless you have observed thousands of runners and actually paid attention to mechanics. 

Recall what I stated in the first post, “in order to run the athlete has be able to properly absorb shock, demonstrates proper alignment of the lower quarter joint and demonstrates good stability of the trunk, pelvis, knee, and ankle”. Or as I put it “YOU HAVE TO BE FIT TO RUN.” 

When analyzing running gait, crucial deviation or faults will be seen during initial contact through all the way through toe off (the period of time one foot is on the ground). With that being said, lets look at the top 5 common running mechanical deviations.  This may be helpful to some runners and clinicians who are trying to figure out why the athlete may be experiencing pain. 

CONTINUE READING….CLICK HERE.

Running Mechanics: The Introduction

IMG_1373.JPG

How many of you have come across avid runners for patients? Have they asked you question about their running gait? Feeling confident with answering their questions? If not, this post is for you.

With 36 million people running in the United states, running has become a big area of study. When it comes to running gait (running much like walking) it will vary from runner to runner according to specific muscle imbalances. For this reason, it is difficult to standardize the “Perfect Form”  however there is research to support what “normal” running should closely resemble.  Why is this important? It is important because within the running community there is an incident of injuries as high at 79%, most occurring at the knee. Therefore, you have to think along the lines that these athlete run hundreds of miles a year, there is a repetitive stress, and the ones that are injured may be moving sub-optimally.  The purpose of this post is to introduce basic running mechanics so that we can further analyze gait in the next post. 

Continue reading ….

The Deadlift: Purposeful and Functional Loading

Screen Shot 2018-10-02 at 4.28.11 PM.png

INTRODUCTION

Can you imagine bending over and staring down at a barbell with weights stacked on each side adding up to over 1000 lb and then lifting that bar from a dead stop off the ground to above your knees? Welcome to the deadlift. A closed chain, dynamic integrated motion, where stammering weight can be moved from the ground, to above the knees, challenging the entire muscular system. Athletes can perform this lift with extremely high weight (world record 1041 pounds), thus dynamic form breakdown can have serious consequences, most commonly at the low back, shoulders, and knees (1). The deadlift exercise is widely used by athletes of many sports, as well as recreational lifters, to enhance power and strength of the posterior chain musculature. How does it measure up to other full body dynamic weighted lifts? Does it really target specific posterior chain muscles or larger groups of muscles more than other complex weighted lifts? And what are the most common faults and injuries seen with power lifts and how can we as movement specialists avoid them? This article will focus on the answers to the preceding questions, shed light on the most common faults seen at each phase of the standard deadlift, look into current evidence to guide when and why one would choose this lift, and describe how to best perform it to target the most sport specific muscles. Enjoy the read!

ANATOMICAL & MOVEMENT FAULT

A 2016 meta-analysis used a systematic review to show that the low back, shoulder, and knee regions were the most commonly injured locations found among varying full body weight and power lifting exercises (1). The deadlift is a full body closed chain integrated movement that can be done a number of different ways with differing equipment. The main muscles used are commonly referred to as the posterior chain, most notably the gluteals, hamstring, erector spinae, and adductor muscles, as well as entire abdominal cavity. There are a multitude of ways to break up any lifting exercise, but I will break up the standard deadlift into three phases: the static start phase, the pull or ascent phase ending with the lockout, and the descent phase. This will allow us to simplify the faults, and match them to the phase they are most occur in. It is important to remember that the individual athlete’s anthropomorphic form will dictate function, and thus as athletes start to get more comfortable with the complexities of the lift or are progressing in rehabilitation from various injuries their form can change. That being said, the underlying principles of this section will guide the clinician towards honing in on areas of commonly seen movement faults and sites of tissue break down to make the lift as safe and effective as possible.

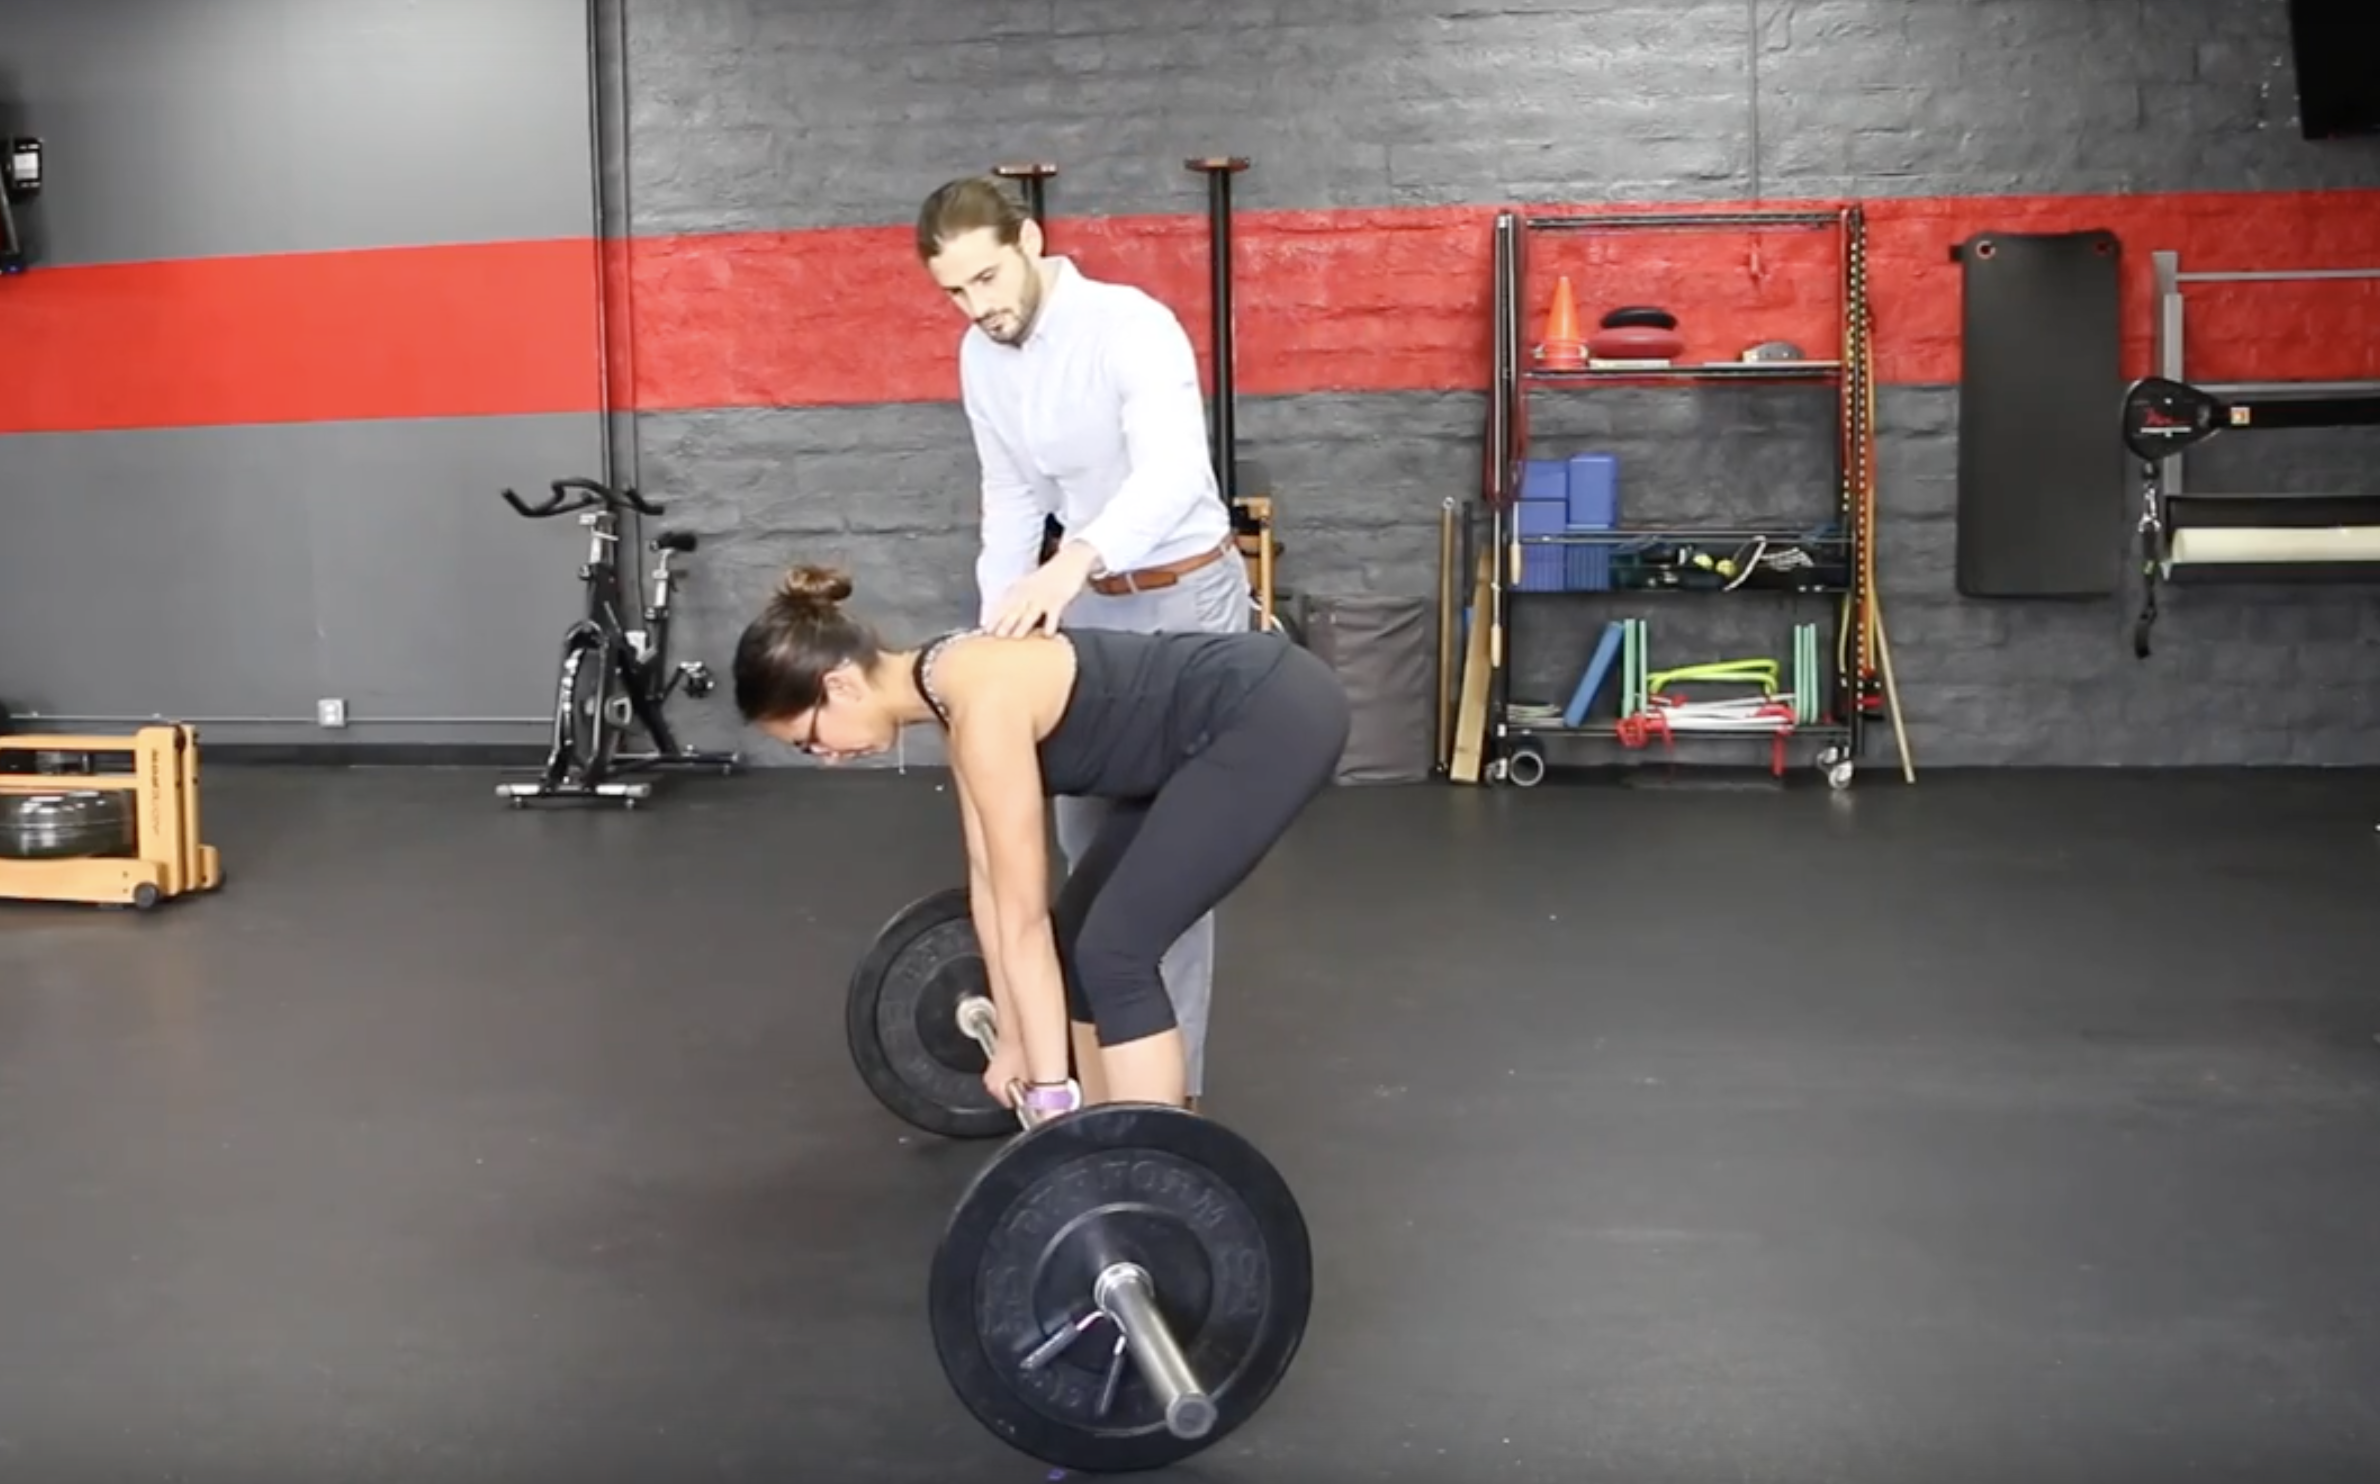
Prior to the lift have the athlete watch you or another person perform the lift from multiple planes while explaining the what, where, and why of the most common faults seen at each phase. It may be important to talk about proper stance width, grip type, external equipment use (such as wrist wraps, weight belts, shoe selection, knee wraps, bar type), and lifting goals with special emphasis on the muscles of focus and purpose of the lift itself. Watch the patient perform this complex power lift from at least 2 planes in order to get the full kinematic picture before deciding what to optimize.

Tune in next week to learn the different phases of deadlift…

Here’s the continuation of the The Deadlift: Purposeful and Functional Loading, and below are the different phases of deadlift

A. Static Start Phase

At the starting position of the deadlift we want our athletes in a position that will maximize perpendicular bar path and vector force from the ground without putting any anatomical structures under excessive or unnecessary shearing, compressive, or torsional forces. This means starting with specific resting muscle tension and stored potential energy, with the hips higher than the knees, weight back into the heels, and the bar making contact with their shins. Many of the studies in this article that have focused on the deadlift or power lifting have shown that the low back is the overall most common source of tissue breakdown. Therefore let’s take a moment to unpack why this could be. It is thought that the correct way to start this lift is with the weight resting on the floor, where the athlete must have adequate low back, hip, knee and ankle range of motion and be able to support all structures in this position with significant tissue wind up and potential energy. It is erroneous to think that every lifter is capable of starting this lift from the floor with a safe neutral lumbar spine position, considering that each person's torso, femur, tibia, and arm length vary drastically. This, plus soft tissue factors lead to limits in starting position with the weight on the floor. The most common movement fault and poor compensatory pattern that can be seen in order to lift a bar from the ground at this phase is starting the lift with a posterior pelvic tilt with lumbar spine flexion. The underlying principle is that in order to reduce low back injury the athlete must maintain a neutral lumbar lordosis from the start to the end of the lift. Using both in vivo and in vitro analysis with multiple modes of real time imaging and biomechanical computer modeling programs it has been shown conclusively that as the lumbar spine becomes more and more flexed the contribution of the lumbar stabilizing musculature decreases and the supportive force generated by the ligaments and bony tissue increases, resulting in higher shearing forces and increased likelihood for low back injury (11-12). Thus each athletes individual safe full range of motion for this lift starts with the lowest possible bar position prior to a posterior pelvic tilt. Accommodations for bar height can be made by having the athlete start with the weights elevated on steps, block risers, barbell plates themselves, or assisted rack risers. Be sure to educate the athlete that each lifter should start and end the lift with a neutral spine and due to each athlete’s individual body proportions there is no single right way for every athlete to perform the same lift, and this may change with tissue adaptations throughout life.   

Another way to add to low back support is through increased trunk stability and activation via ancillary exercises as shown in past months articles. Prior to and throughout the entirety of the dynamic phases of the lift the athlete must activate his or her core musculature in order to increase intraabdominal pressure which has been shown to further add to trunk active stiffness and reduce the sole reliance on the low back musculature. Breathing with these lifts should be done after the entire lift is completed before the next rep with the weight on the ground or at the top of the lift just before the descent, but never in the pull or descent phases. During these phases the systems maximal effort is required, and thus keeping this intraabdominal pressure constant will lead to improved overall trunk stability.

Another area of concern is shoe choice which may affect starting dorsiflexion position, and thus affect trunk and hip starting position. This can be addressed by trying the lift with varying external heel heights or insoles and then getting a shoe to match. Secondarily, since this is a power exercise we want our athletes to choose a shoe whose sole provides a firm, wide, flat stable base which can correct for excessive medial arch collapse if needed. This is very important as we want to make sure that no ground reaction force is lost due to an air or large foam soled running or cross training shoe. Providing a firm stable base to push from, with the deadlift has been shown to reduce the lift’s overall force production and muscle activation (6). In summary for the starting position, make sure the athlete starts with a neutral spine, avoiding a posterior pelvic tilt with a strong abdominal bracing engagement and using a shoe that allows for correct body position accommodating any anatomical foot variances from the ground up if needed.   

B. Pull/Ascent Phase

A poor movement compensation commonly seen at the start of the lift is when athletes initiate the pull with a superior eye gaze going into cervical hyperextension, which can lead to cervical structures being compressed and sheared. There are however some schools of thought that purposefully promote cervical spine hyperextension with weight lifting in order to enhance and increase the lumbar spine extension needed for the attempted weight. It is said that the cervical and the lumbar spine both represent developmentally, what is called a secondary spinal curve, and thus have a deeply rooted connection. where cervical spine extension will promote, mirror, and enhance lumbar spine extension. As this connection is still theory, a common way to reduce balance is to have athletes look upwards, reducing the ability for the body to right itself visually and vestibularly. It is safest to keep our athletes close to cervical spinal neutral as possible, with a constant chin neck angle between 60 to 90 degrees, thus avoiding excessive cervical extension and limit stress on the passive structures of the cervical spine. A unique way to train neutral cervical spine position is to have the athlete hold a softball or tennis ball under their chin by nodding down on the ball, pressing it against their manubrium/ jugular notch but be sure to match the chin neck angle to the size of the ball. Next have them perform the deadlift unweighted for form, while holding the ball in place with the pressure from their chin. This will not only turn on the deep neck flexors adding cervical spine stability but it will show them that their eye gaze must change as they become up-righted throughout the lift.

Next, in order to maximize the perpendicular work force during the entire pull phase of the lift it is pertinent that the bar path is a straight line that is perpendicular to the ground at all times. The bar should stay as close to the lifters shins and body as possible, avoiding any sagittal plane motions. As the bar travels away from the shins and body there is a linear increase in the moment arm from the hips, which adds increased shear and strain stressors on the low back, as well as a linear loss in perpendicular power and energy that can and should be corrected. The movement specialist can best identify this fault by watching the bar path from the lateral view. As previously stated, the bar should stay in contact with the shins with weight being more into the heels, hence why many serious lifters may prefer to wear thin shin guards to prevent scrapping the shins. One common fault that can be seen as the athlete clears their knees with the bar, is that the athlete pulls the bar posterior losing a perpendicular path to meet their hips, to finish the lift standing erect. To facilitate a straighter bar path simply have the athlete squeeze their glutes and thrust their hips forward to the bar immediately after the bar passes their knees, instead of pulling the bar back to meet their hips. This will lead to less energy lost in the sagittal plane and a safer constant strain on the low back. Other ways that have been listed in various resources to cue a straight bar path is by using an unlocked Jones machines which uses  supportive uprights, videotaping the lift with post lift assessment and reflection, external verbal cues, tactile cues by wearing shin guard and having the athlete purposefully scrape the shin to keep the bar in contact with the body. Also, during the pull phase the majority of loaded tibiofemoral motion will be completed and thus it is pertinent to talk about the most common movement faults seen at the knee and how to avoid them. The most common movement fault seen here is tibiofemoral adduction with or without internal rotation, which can be seen as the knee dives inwards and the thigh rotates. This can be further increased if the foot is set into excessive eversion with the base of support too wide leading to the athlete’s inability to keep the knees tracking over the toes (leading to more femoral Adduction with internal rotation). This fault can lead to increased ligamentous and soft tissue stress and increase the likelihood of patellofemoral irritation. It is important to work with our athletes to find the correct stance which allows them to keep their knees tracking over their toes, avoiding both primary and relative femoral adduction and internal rotation. Also, make sure if the athlete is using knee wraps, as is common with weighted deadlifts, that the knee wrap is applied from medial to lateral thus promoting a tactile facilitation into tibiofemoral external rotation and abduction as wrapping the joint from lateral to medial may seem picky but it will promote facilitation of the athletes knee into a faulty position which is not advised.  Finally at the end of the pull we can focus on the low back during the terminal bar position, referred to as the lockout phase. A common fault at this phase is for the athlete to perform the lift in lumbar hyperextension, which can lead to facet joint irritation and undue stress on the low backs passive structures as well as decreased the total time under tension of the dynamic muscular structures. Focus on cueing them to stand straight up and finish the lift by squeezing the glutes and lift the chest with the lumbar spine in neutral not by extending the low back. This poor compensatory pattern may be due to the athlete’s lack of control towards the end of the lift requiring a bony stop to reach the lockout phase or just misunderstanding of how the lift should look at its terminal phase as loaded end range facet joint positions are not advised at the lockout phase of the deadlift.

C. Descent Phase

In this phase the athlete will either be slowly lowering, or dropping the weight, depending on the amount of weight. It is important that it is done with a neutral spine, avoiding a posterior pelvic tilt.

Again, look at lifts from at least 2 planes/views in order to get the full kinematic picture before deciding on what to optimize. See below for a much more detailed version of the lift broken down into 2 planes can be seen below in the “Deadlift Movement Fault Guide” and “Quick Look Movement” along with the supplementary videos and pictures. I strongly urge you as a movement specialist to further look into books by Dr. Stuart McGill, professor of spine biomechanics at the University of Waterloo, who’s books focus on evidence based lumbar spine and high level sports related lifts and motions. Also, look into Mark Rippetoe’s “Starting Strength” book for a professional biomechanical power lifting approach, or Ma Strength’s recently translated Chinese evidence based Olympic lifting manual and videos on various social media where you can get a plethora of different evidence based training tips and ideas. Along with these great resources I frequently look into published kinematic studies of various lifts. Having said this if you follow the recommendations above of the most common faults seen at each phase you can reduce the chances of unnecessary tissue stress and strain leading to increased risk for pain or injury for your athletes.

Follow us next week to conclude with the evidence in muscle activation during the deadlift compared with other strength lifts.

For the final segment of the The Deadlift: Purposeful and Functional Loading, and below lists the evidence in muscle activation for the deadlift compared to other strength lifts.

EVIDENCE

Now we will use evidence to look at the specific muscles the deadlift targets, how it measures up to other power and strength lifts, the effects of different equipment used with the deadlift, who could benefit from this mode of training, the effects of differing grips and supplementary perturbation training with this lift.

This first study focuses on hamstring activation due to its inherently large muscular involvement in the deadlift movement. Hamstring muscle power deficit and muscular ratio imbalance between the quadriceps and hamstring muscles have been proven many times over to be strong predicting factors of future and past hamstring strains. Thus, in this study 11 weight trained, high level, male athletes were used in order to compare the single leg deadlift, versus the hamstring curl, and the squat, for 3 repetitions at 75% 1RM. They measured the biceps femoris and semitendinosus eccentric and concentric muscle activation in the three different exercises. They found that the concentric hamstring curl and single leg deadlift elicited the greatest integrated and highest peak EMG activity of the hamstrings, with no significant difference between these two exercises. The concentric squat showed approximately 50% the integrated EMG activity and 70% the highest peak hamstring activation (9).

Mcallister et al. compared muscular EMG activation eccentrically and concentrically using the leg curl, good morning, glute-ham raise, and Romanian deadlift exercises. This study used twelve healthy, weight-trained men who performed duplicate trials of one repetition at 85% 1RM for each lift in random order. The study monitored the erector spinae, gluteus medius, semitendinosus, biceps femoris, and medial gastrocnemius, and showed that there are significant differences in activation within the same muscles when comparing all exercises eccentrically to concentrically (8).

When looking at EMG muscle activation of the gluteus maximus, biceps femoris, and erector spinae with the barbell deadlift, hex bar deadlift and hip thruster for 1RM, we see that there is small, yet important differences in muscle activation based on each exercise chosen. When Andersen et al. compared these three lifts with thirteen healthy resistance-trained men, aged 20–25 years old, they found that the barbell deadlift was clearly superior in activating the biceps femoris compared to the hex bar deadlift and hip thrust. The hip thrust showed slight favor towards the highest gluteus maximus activation and all three exercises had similarly high erector spinae activations. During a lift with maximum loading, the hip thrust, had the highest, although insignificant, muscle activation for the gluteus maximus, particularly in the upper phase of the movement.  The two standing exercises had possibly decreased tension on the hip extensors. On the other hand, the hex bar deadlift generally provided the lowest muscle activation for all leg these muscles tested. These slight changes in muscle activation can be used when we are looking for athletic optimization and correct exercise choice for the muscles we want to target (2).

Next let's take a look at Camara et al. whose study compared muscle activity with the barbell deadlift and hex bar deadlift, using submaximal loading among 20 resistance-trained men. Subjects performed the hex bar and straight bar deadlift for 3 reps at 65 and 85% 1 RM. The study used electromyography (EMG) to calculate the muscle activation of the vastus lateralis, biceps femoris, and erector spinae, as well as a force plate to measure peak force, peak power, and peak velocity. This study found significantly greater normalized EMG values of  the vastus lateralis for both the concentric and eccentric phases of the hexagonal-barbell deadlift and significantly greater EMG values of the bicep femoris during the concentric phase and of the erector spinae during the eccentric phase with the barbell deadlift. The hexagonal-barbell deadlift demonstrated significantly greater peak force, peak power, and peak velocity values than those of the straight-barbell deadlift. These results suggest that the lift variations led to different patterns of muscle activation and that the hexagonal barbell may be more effective at developing maximal force, power, and velocity and that for those with lower back related symptoms the hex bar deadlift may be more optimal due to its ability to more evenly distribute the load among all weight bearing joints and reduce the moment at the lumbar spine. Conversely, one should choose the straight bar deadlift if the goal of the training session is to emphasize activation of the lumbar and hamstring musculature (5).  

 The next study looked at subjects with mechanical low back pain to see which factors at initial assessment would predict if a subject would have a beneficial or poor outcome with a deadlift strength training program. The study used 35 subjects, 26-60 years old, with a dominating pattern of nociceptive mechanical low back pain, with a duration for at least 3 months. Each subject’s age, sex, and body mass index were taken and each subject completed the Patient-Specific Functional Scale, the Roland-Morris Disability Questionnaire, as well as a 100mm visual analog scale. Each subject was taken through a movement control test battery made up of 7 lumbar hip dissociation tests, and was timed on 3 trunk muscle endurance tests (the side bridge, prone bridge, and the Biering-Sørensen prone extension). The deadlift exercise was then performed 12 times during an 8-week period. The results showed that the higher the pain intensity, >60mm on VAS, and the lower performance on the Biering-Sørensen test, <60 seconds at initial evaluation, the less likely that participants were to benefit from deadlift training regime. The most robust predictor being the Sørensen hold time. The Sørensen test was postulated to be more significant than the VAS scale due to its ability to test the activation capacity of the stabilizing hip and back extensors for a sustained period. Thus if low endurance of the hip and back extensors and high pain intensity are found at initial evaluation with an individual with mechanical low back pain, other interventions should be considered to improve these tests prior to initiating deadlift training for the most beneficial outcomes (4).

It has been suggested that the inclusion of instability devices in resistance training may increase muscle activation in the trunk and extremities to a greater extent than traditional resistance training methods. Chulvi-Medrano et al. tested this theory while monitoring lumbar multifidus spinae, thoracic multifidus spinae, the lumbar erector spinae, and thoracic erector spinae through EMG, while measuring pull force output through a load sensor attached from the bar to the ground using 31 resistance-trained participants. Each participant performed a 5 Sec MVIC isometric deadlift pull followed by 5 repetitions with 70% 1RM weight while standing on flat ground, on a T-Bow (U-shaped rocker board with coronal plane motion as an unstable surface), and on a Bosu trainer (flat side down). This study showed that performing deadlift maximal holds and dynamic deadlifts under stable conditions produces more EMG activity of the back musculature and more overall pulling force. Therefore, the use of instability devices in deadlift training does not increase pull force performance, nor does it provide greater activation of the paraspinal/ trunk posterior chain muscles (6).  

When running my searches for the highly discussed topic of grip types, I came across a very interesting master’s thesis study in 2011 by Beggs, which focused on this very controversial topic of grip type and muscle activation. Powerlifting websites commonly have many questions pertaining to this topic with such questions as: “Should both hands be pronated? Should I use an alternate grip? Which hand should be supinated or pronated if I do use an alternate grip? This study examined muscle activation and relative joint angles during a barbell deadlift while using either a double‐pronated or right and left overhand/underhand (OU) grip with each participant testing 3 grips total. This study used ten weight‐trained individuals average age of 21.2 years old who performed the barbell deadlift with 60% and 80% of their 1‐repetition maximum with wrist straps allowed for double-pronated 80%1 RM only. The EMG recordings were taken of the left and right biceps brachii, brachioradialis, upper trapezius, and upper latissimus dorsi, and motion capture was used to measure angles of the wrist, elbow, knee, and hip. This study shows some important considerations for upper extremity athletes who want to start, or are currently performing this lift, and already have increased game and practice stress placed at the elbow and wrist or who are prone to the overuse and underuse of certain upper extremity muscles. In summation, the supination grip hand showed significantly greater biceps EMG activity than ALL pronated‐hand conditions at equivalent intensity and significantly less Brachioradialis EMG activation. Surprisingly The trapezius and latissimus dorsi showed no statistically significant findings with respect to grip. When looking at joint angles supination caused significantly more wrist flexion, elbow extension, and neither knee nor hip angles were significantly different at any point between the three grip variations at either 60 or 80% of 1‐RM (3). If there is no need to be concerned with specific upper extremity muscle overuse and the athlete is to use an alternate grip the most important thing is to watch them lift with each option and then choose the grip that the athlete is most confident with as well as the one that shows a superior normalization of upper extremities and spinal structures.

It is pertinent to use the research and anatomical fault guidelines to optimize our athletes in high level performance power lifts in order to better target sport specific movement and musculature as well as to reduce unnecessary stress and strain on joints and body regions already placed under a high demand.

DEADLIFT MOVEMENT FAULT GUIDE

“There is no ONE perfect way for EVERY athlete to perform the same lift, but there is ONE perfect way for EVERY individual athlete to  perform each specific lift which may change throughout their life.”

Lateral View:

  • Chin neck angle constant 60-90 (Cue: Hold a tennis ball under chin- DNF, Stick on back/ head, allow gaze to follow body)

  • External auditory meatus over shoulder

  • Slightly lifted chest, knees bent, butt must always start higher than the knees at the start (this is not a squat)

  • Pull shoulders together, engage mid traps, reduce scapular upward rotation (rhomboid overuse) and elevation (upper traps overuse) on the start

  • Hand width will vary but will be outside the thighs with feet about hips distance apart

  • Thumbs always under bar (Alternate grip if heavy but check to see which ER/IR arm shows the most neutral spine and normalized positioning )

  • Abdominal Brace (Breath in and out at the bottom of deadlift prior to pull phase)

  • Lumbar spine neutral to start, without trunk rotation via visibility of both shoulders (Avoid starting in a posterior pelvic tilt ALWAYS)

  • Feet hips distance apart or slightly wider (Should only see 1 foot from this view as they will be in the same frontal plane)

  • Feet up to 30 degrees Eversion

  • Initiate by sitting back into heels and by pulling the bar towards the shins just prior to the pull phase

  • Initiate with a hip drive and glutes squeezed towards the bar, then allow knee extension and continue with a 1:1 knee and hip extension rate (Do not pull the bar to your hips, instead thrust your hips to the bar)

  • Trunk must lean forward with a neutral spine to make the correct bar path

  • Pull Sequence  (Hip extension and Knee extension 1:1 ratio; STOP with back in neutral, Hips flexed, Knees flex, Bar touches risers/ ground)

  • Bar is never more than 1” from body to reduce spinal torque and lost energy

  • Avoid lumbar spine hyperextension at lockout (Seen with hips anterior to shoulders) Stop in lumbar spine neutral, chest lifted, and glutes squeezed

  • Knees pulled out over toes 1-3, Avoid excessive tibiofemoral anterior translation

  • Bar starts and ends over mid foot (Straight and perpendicular bar path to the floor)

Posterior View:

  • Chin neck angle constant 60-90 (Cue: Hold a tennis ball under chin- DNF, Stick on back/ head, allow gaze to follow body)

  • No cervical side bend, or excessive hinge creasing

  • Slightly lifted chest, knees bent, butt must always start higher than the knees at the start (this is not a squat)

  • Shoulders pulled together and engaged mid traps (try to reduce scapular upward rotation from rhomboids and elevation form upper traps on the start)

  • Hand width will vary but will be outside the thighs with feet about hips distance apart

  • Thumbs always under bar (Alternate grip if heavy but check to see which ER/IR arm shows the most neutral spine and normalized positioning

  • Pull shoulders together, engage mid traps, reduce scapular upward rotation (rhomboid overuse) and elevation (upper traps overuse) on the start

  • Body centered on the Bar (Hands equal distance from body, checked via distances from the plates and knurling of the bar)

  • Abdominal Brace (Look for excessive lateral trunk shift/ lean or lateral posterior wall creasing, Breath in and out at the bottom of deadlift prior to pull phase)

  • Lumbar spine neutral to start (Avoid starting in a butt wink/ posterior pelvic tilt ALWAYS)

  • Feet hips distance apart or slightly wider

  • Feet up to 30 degrees Eversion (Lateral toe sign should be symmetrical)

  • Initiate by sitting back into heels and by pulling the bar towards the shins

  • Initiate with a hip drive and glutes squeezed towards the bar, then allow knee extension and continue with a 1:1 knee and hip extension rate (Do not pull the bar to your hips, instead thrust your hips to the bar)

  • Trunk must never shift right or left and both legs should extend at the same rate

  • Trunk must lean forward to make correct bar path

  • Pull Sequence  (Hip extension and Knee extension 1:1 ratio; STOP with back in neutral, Hips flexed, Knees flex, Bar touches risers/ ground)

  • Avoid lumbar spine hyperextension at lockout (seen via creasing) Stop in lumbar spine neutral, chest lifted, and glutes squeezed

  • Knees pulled out over toes 1-3, Avoid femoral adduction/ internal rotation (Use theraband as tactile cue as in squatting)

  • Bar starts and ends over mid foot (Straight and perpendicular bar path to the floor)

Quick Look Movement:

  • Start Position: Spinal neutral (no posterior pelvic tilt), Feet hips distance, Sustained chin tuck (60-90), butt higher than knees at all times

  • Abdominal Brace (Breath in and out at the bottom of the deadlift, never during dynamic motion)

  • Sit back and load body, then initiate with hip hinge and glute squeeze, driving hips towards the bar followed by knee extension

  • Pull Sequence  (Hip extension and Knee extension 1:1 ratio; STOP with back in neutral, Hips flexed, Knees flex, Bar touches risers/ ground)  

  • Avoid femoral adduction/ internal rotation

  • Motion ends at the lockout with athlete in lumbar spine neutral, chest lifted, and glutes squeezed

  • Maintain spinal neutral for weight drop or controlled lowering

Research Quick Reference:

  • Athletes with mechanical low back pain least likely to benefit from deadlift training have a Sørensen <60 seconds and a VAS of >60mm (6/10)

  • Men at 65% to 85% 1 RM reduce lumbar spine stress and increase vastus lateralis EMG activity,  greater peak force, peak power, and peak velocity with Hex bar deadlift.

  • Use straight bar deadlift to emphasize activation of the lumbar region and hamstrings.

  • The use of instability devices in deadlift training does not increase force performance, nor does it provide greater activation of the paraspinal/ trunk posterior chain muscles

  • At 75% 1RM the leg curl and single leg deadlift involve the hamstrings to a similar degree, while the back squat involves about 50% the integrated and 70% the peak hamstring EMG activity.

  • There is significantly different muscle activation during each lift’s eccentric and concentric phases.

  • Pronated or supinated grip will change wrist and elbow joint angles and lead to differing upper extremity muscular EMG activation when performing deadlift at 60% and 80% 1 RM, thus be mindful of grip with upper extremity repetitive athletes to avoid commonly overused tissues.

CITATIONS

  1. Aasa U, et al. Br J Sports Med 2017;51:211–220. doi:10.1136/bjsports-2016-096037

  2. Andersen, Vidar, et al. “Electromyographic Comparison Of Barbell Deadlift, Hex Bar Deadlift And Hip Thrust Exercises.” Journal of Strength and Conditioning Research, 2017, p. 1., doi:10.1519/jsc.0000000000001826.

  3. Beggs, Luke Allen, "Comparison of muscle activation and kinematics during the deadlift using a double-pronated  and overhead/underhand grip” (2011). University of Kentucky Master's Theses. 87.

  4. Berglund, Lars, et al. “Which Patients With Low Back Pain Benefit From Deadlift Training?” Journal of Strength and Conditioning Research, vol. 29, no. 7, 2015, pp. 1803–1811., doi:10.1519/jsc.0000000000000837.

  5. Camara, Kevin D., et al. “An Examination of Muscle Activation and Power Characteristics While Performing the Deadlift Exercise with Straight and Hexagonal Barbells.” Medicine & Science in Sports & Exercise, vol. 48, May 2016, p. 470., doi:10.1249/01.mss.0000486413.06515.da.

  6. Chulvi-Medrano, Iván, et al. “Deadlift Muscle Force and Activation Under Stable and Unstable Conditions.” Journal of Strength and Conditioning Research, vol. 24, no. 10, 2010, pp. 2723–2730., doi:10.1519/jsc.0b013e3181f0a8b9.

  7. Distefano LJ, Blackburn JT, Marshall SW, Padua DA. “ Gluteal muscle activation during common therapeutic exercises.” J Orthop Sports Phys Ther. 2009 Jul;39(7):532-40. doi: 10.2519/jospt.2009.2796.

  8. Mcallister, Matt J., et al. “Muscle Activation During Various Hamstring Exercises.” Journal of Strength and Conditioning Research, vol. 28, no. 6, 2014, pp. 1573–1580., doi:10.1519/jsc.0000000000000302.

  9. Wright, Glenn A., et al. “Electromyographic Activity of the Hamstrings During Performance of the Leg Curl, Stiff-Leg Deadlift, and Back Squat Movements.” Journal of Strength and Conditioning Research, vol. 13, no. 2, 1999, pp. 168–174., doi:10.1519/00124278-199905000-00012

  10. Fisher, J., et al., A randomized trial to consider the effect of Romanian deadlift exercise on the development of lumbar extension strength, Physical Therapy in Sport (2012), doi:10.1016/j.ptsp.2012.04.001

  11. McGill, S.M. 2002. Low Back Disorders: Evidence-Based Prevention and Rehabilitation. Champaign, IL: Human Kinetics. 4D WATBAK biomechanical computer model, version 2.0.3. 1999. Faculty of Applied Health Sciences, University of Waterloo, Ontario, Canada.

  12. McGill, Stuart. Ultimate Back Fitness and Performance Fourth Edition .Waterloo, Ontario Canada, 2009. Print. (P.73)

  13. Rippetoe, Mark., and Lon Kilgore. Starting Strength: Basic Barbell Training.3rd ed. Wichita falls, Tx: Asagaard Co, 2011. Print.

  14. Robbins, David CSCS, NASM-CPT, "A Comparison Of Muscular Activation During The Back Squat And Deadlift to the Countermovement Jump" (2011). SHU Theses and Dissertations. 1.

  15. Schellenberg F, Taylor WR, Lorenzetti S. Towards evidence based strength training: a comparison of muscle forces during deadlifts, goodmornings and split squats. BMC Sports Science, Medicine and Rehabilitation. 2017;9:13. doi:10.1186/s13102-017-0077-x.

Barbell Hip Thrust: The Gluteus Maximus’ Best Friend

INTRODUCTION

Over the past 10 years we have seen an increase in many new innovative ways to strengthen muscles. One exercise that has gained vast popularity is the barbell hip thrust; but is it effective for muscle activation, hypertrophy, and strength gains and does it correlate to athletic performance enhancement? This and more will all be covered in this throughout this post as we dive into the anatomy and kinematics of the hip thrust, reasoning for how and why to use the hip thrust, and how it compares to other full body lower extremity exercises.

When thinking of training movement for higher-level athletes we have to incorporate sport specific training motions. One way of doing this is by using the “force vector training theory”. Which is based on the principle that the most sport specific muscular adaptations and movement enhancing carryover will be derived from training the athlete in their sport specific body position to directly oppose or resist the most exact line of pull, or direction of resistance that they will encounter when playing their full speed sport (8). Basically, we should be training each athlete according to the proper sport specific force vectors and optimal muscle activation patterns (8).

End range hip extension strength and force generation for horizontal acceleration used in sprinting, soccer, football, and many other professional sports can be very important and few exercises currently focus on this concept. The barbell hip thrust is inherently different from other forms of closed chain lower extremity training modes such as the squat or deadlift due to the fact that it imposes a anteroposterior vector load rather than a superior inferior axial vector load. Research is now showing that this horizontal force training application can lead to increased sprinting speeds as well as other sport specific adaptations thought to mainly be obtained through axially loaded exercises (2).

ANATOMY

Anatomically I will focus mainly on the gluteus maximus muscle as it pertains to the barbell hip thrust, as this is one of the main muscles of interest in current literature when looking at strength, power, and injury prevention of the lower quarter. The gluteus maximus is a multiplanar muscle that has been proven to aid in knee and pelvic/ trunk stability. In Addition, it’s proper functioning has been shown to have a protective effect against many lower and upper extremity injuries and is a fundamental muscle required for all lower (and the majority of upper) extremity ballistic sport movements. The gluteus maximus has been linked time and time again to its role in the tibiofemoral joint’s frontal plane moment by the many articles published by Powers et al. A single gluteus maximus muscle can be further broken down into three activation subdivisions in the sagittal plane and two activation subdivisions in the frontal plane. These activation subdivisions have been shown to fire separately based on the specific task performed (11,12). This unique and separate muscle subdivision activation of the gluteus maximus has been studied with various tasks being assessed by a laser-based mechanomyographic monitoring technique. It was measuring the mean contraction time in subdivisions of the muscle, both in the sagittal plane (superior, middle, inferior) and in the frontal plane (medial and lateral) (11,12).  These studies help us further understand how certain subdivisions of a large muscle can be functioning optimally in certain ranges of joint motion or during a specific part of a sports activity, and not in other ranges or parts. This helps shed light on the importance of the concept of vector specific muscle adaptations and training. It shows that certain portions of the same muscle can be functioning sub optimally at perhaps only one part of a sport specific motion, and that sometimes this depth of training specificity becomes vitally important if we want the whole muscle to work optimally, in order to best perform a high level integrated athletic movement. For Example, lets say a muscle may be working quite well with the hip in 90 degrees of hip flexion it does not mean that for the rest of the available range of motion it will continue to work optimally if it is never tested or trained in that range.

Other muscles which should be addressed and studied with this exercise are the quadriceps, gluteus medius and minimus, adductors, hamstrings, tensor fasciae latae, as well as any other muscles attached to the pelvis aiding in its stability and force generation such as the obliques, psoas, iliacus, deep and superficial lumbar extensors, and rectus abdominis. It is clear that this is a multifactorial exercise, which will activate many other muscles besides just the gluteus, so it is good to keep all of these anatomical connections in mind. Using anatomical kinematics it is easy to see how this exercise could correlate to sport specific improvements and could be favored by athletes of various professional and collegiate sports. It is important to also think of the vast clinical implications of this exercise as it will be shown to be a viable option for lower extremity strengthening, in the case that there are limitation such as: an athlete who has pain with end range hip flexion, pain and sensitivity with axially loading of the lower extremities, is on weight bearing precautions, has knee flexion extension limitations, or is for some reason unable to strengthen in an upright position. Versatility and creativity is a tool worth its weight in gold when rehabilitating injured high level athletes and this is another example of a creative way to strengthen and train which has been shown to have sport specific carryover, with comparable if not better muscular activation, than many traditional axially loaded closed chain lower extremity exercises.

EVALUATION

Let me start with a very important side note. Many studies currently use EMG (Electromyography) testing to analyze muscle activation during different exercises and movements. There are a few misconceptions with this. Electromyography measures the amplitude of electrical activity (the sum of the electric potential differences) of all of the active muscle motor units during a selected exercise that can be detected by the electrode placement. EMG cannot be said to solely measure motor unit recruitment as it measures motor unit recruitment combined with motor unit firing frequency. EMG does not directly measure force or force production, although some research shows a linear relationship between the two when the muscle being tested is not under fatigue. Another complication is that EMG activity will increase as it picks up on increased intracellular action potentials given off with increasing muscular fatigue that can be misconstrued as increased muscle activation. Thus EMG amplitude can be safely said to be an overall measurement of motor unit activity in the muscles required for each tested movement. This makes it most appropriately used to help the professional correctly choose the exercises that target the specific muscles we are trying to train or that are needed for each sport specific movement. Extrapolating that muscle EMG results lead to the selected muscle histological hypertrophy, specific strength, force production, or functional gains would be erroneous as further longitudinal research or research focused on these sport specific outcomes as variables would have to be used to back this thought. We are now seeing studies which combine both EMG testing and sport specific functional movement pre and post testing in order to correctly correlate sport specific adaption carryover attributed to different training modes.

The purpose of this first study, from 2015, was to compare the surface EMG activity of the upper and lower gluteus maximus, biceps femoris, and vastus lateralis between the back squat and barbell hip thrust, both dynamically and with a 3 second isometric hold. Thirteen trained women, mean age twenty-eight years old, performed an estimated 10-repetition maximums in the back squat and barbell hip thrust. The barbell hip thrust elicited significantly greater mean and peak upper gluteus maximus, lower gluteus maximus, and biceps femoris EMG activity than the back squat. There were no significant differences in mean or peak vastus lateralis EMG activity. Thus with this select population, the barbell hip thrust is a viable option for training the lower extremities which activates the gluteus maximus and biceps femoris to a greater degree than the back squat using an estimated 10RM load (6).

Furthermore, because the knee is flexed during the barbell hip thrust as the hip is driven into full extension it is theorized that the hamstrings are put into a position of active insufficiency, which would lead to a greater muscular effort requirement from gluteus maximus to generate sufficient hip extension torque. However other synergistic muscles such as the adductors could also produce this torque. Another study used EMG to show that when testing maximal isometric hip extension torque at 90°, 60°, 30°, and 0° hip flexion angles the gluteus maximus EMG activity is lowest with the hip in 90° of hip flexion and highest with the hip in 0° of hip flexion which would correlate more closely to the thrusters line of resistance and movement than that of a traditional squat (17).

Next, in 2016 a study focused on comparing the differences in upper and lower gluteus maximus, biceps femoris, and vastus lateralis EMG amplitude for the barbell, band, and American hip thrust variations. Again, thirteen healthy female subjects, mean age twenty-eight years old, performed 10 repetitions of their 10-repetition maximum of each variation in a counterbalanced and randomized order. The barbell hip thrust variation showed statistically greater mean gluteus maximus EMG amplitude than the American and band hip thrust variations, and statistically greater peak gluteus maximus EMG amplitude than the band hip thrust variation, but no other statistical differences were observed (5).

Now that we see that these EMG studies support the use of the barbell hip thrust to activates the gluteus maximus and other lower extremity muscles, the next question is does this correlate to functional sport improvements? A pilot study consisting of twenty-six participants, mean ages twenty-two years old, with an athletic background were recruited to participate in this study. The participants were divided into four groups, consisting of the back squat, deadlift , hip thrust, and control group. They took part in training three times weekly for a total of six weeks. This training followed a condensed linear periodization model consisting of a two-week emphasis on hypertrophy, two-week emphasis on strength, and a two-week emphasis on power and showed promise in functional gains (2). Then in 2016 a formal study compared the front squat to the barbell hip thrust by measuring the sport specific outcomes of vertical jump, horizontal jump, 10m sprint, 20m sprint, hip thrust, front squat, and isometric mid-thigh pull. The study consisted of twenty-four male rugby and rowing athletes, ages fourteen to seventeen years old, who were assigned to perform in the hip thrust or front squat group with workouts twice per week for 6 weeks, for a total of 12 sessions. The front squat and barbell hip thrust group results were broken down further into 8 effect size groups ranging from “Most unlikely” (<0.5%) to “Most likely” (>99.5%) effect size based on a 90% confidence limit in order to qualify the true effect size. The between-groups results are as follows; both the vertical jump and 3RM front squat “Possibly” (25-75%) favored the front squat group. The 10m and 20m sprint times “Possibly” (25-75%) favored the hip thrust group and it is “Unlikely” (5-25%) that one intervention was better than the other for improving the horizontal jump (3). When looking at the barbell hip thrust within-group effects as they correlate to the functional sport specific tasks it is shown that barbell hip thrust has a  “Very likely” (95-99.5%) beneficial effect for the 20-m sprint times and 3RM hip thrust strength and a “Possibly” (25-75%) beneficial effect for the 3RM front squat strength, vertical jump, horizontal jump, and 10-m sprint time (3).

Overall these studies indicate that the barbell hip thrust does activate gluteal muscles but athletes that participate in vertically based sports such as basketball and volleyball may benefit from the front squat more than the barbell hip thrust. However, in sports such as sprinting, football, and other low driving acceleration sports it may be more beneficial for athletes to perform the barbell hip thrust, because of its carryover into horizontal acceleration. Also, from this study the barbell hip thrust does seem to increase front squat and vertical jump performance when looking at pre and post testing. Thus the hip thrust is still a viable option to increase front squat and vertical jumping performance when squatting is contraindicated or just as an adjunct exercise to reduce axial load on the spine. These studies favor the theory that the direction of the resistance force vector relative to the body does play a large role in performance transference, and that axially resisted movements such as the squat appear to transfer better to vertically based sports, and anteroposterior resisted movements such as the barbell hip thrust appear to transfer better to horizontally based activities such as the 20-m sprint (3).

EXERCISE PROGRESSION

Let’s now walk through a possible progression for this exercise, but keep in mind this is very general and all training should be tailored to each individual’s sport function, athlete presentation, or stage of healing at the current time of training. Step one performing a subjective and objective evaluation, joint clearing, and other sport specific testing to make sure the lift is both sport specific, functional, and safe. Next, assess the athletes movement form without a bar, using a visual, verbal, and kinesthetic demo while simultaneously providing reasoning as to why certain body positions are important. Then progressing the athlete to a barbell hip thrust as shown in the accompanying video with this article and refer to the “Quick Look Movement” below for body positional cues and corrections. It may be pertinent at this point to correct movement faults and one of the most common is tibiofemoral adduction. To correct for this, especially with novice lifters, try the proprioceptive cue of an abduction band placed just above the knees. This has been shown in a 2017 squat study to aid untrained participants in the ability to achieve the muscle activation patterns required to promote neutral knee alignment and to resist medial collapse. In this study not only did this lead to neutral/correct tibiofemoral alignment but the addition of the band also increased gluteus max and gluteus medius muscle activity in the novice lifters and did not reduce the firing or change the form of the trained individuals (9). These phases may go fast but remember that this lower weight form is integral, as this lift will eventually be heavily loaded. If breakdown occurs with low weight, then it will most likely mean breakdown at higher weight, which may have larger negative consequences. Next, slowly add weight throughout the single or over multiple sessions. Starting weight can be based on the ease of the motion itself, squat, deadlift, or other lower extremity isometric and dynamic testing and measures.

Now this is where training may start to become very sport specific and goal oriented. Questions that should be asked might be are we looking to gain speed of contraction, to train around pain, to retrain muscles in new ranges of motion, or teach new motor patterns? These concepts and goals will dictate if we progress to using such aids as bands on the bar to train certain concepts of muscle adaptation, or add in training for ballistic speed, or start to add in upper extremity motions. Another concept is to train for differing lower extremity positions adding hip thrust with femoral abduction, adduction, internal, external rotation, and varying knee flexion angles based on sport specific lower extremity positional strength within safe kinematics and reason. This thought of training athletes in sport specific lower extremity positions which are not kinematically perfect but still safe is a slightly odd concept which should not be taken lightly as I do not think putting joints and athletes at risk for injury is wise when training. However, it would be false to think that an athlete who is stable and strong in a single idealized position would be stable in the  sport’s sometimes required unidealized body positions or movement patterns. Thus training towards these patterns or with differing lower extremity positions is not always a far off thought. Pushing the thought process up the chain, do we want to theoretically increase torsional stress on the trunk by performing the exercise single leg, with unstable hanging weights, with weight differences side to side, or on an unstable surface. Finally, I strongly believe after performing these strengthening exercises it is necessary to then put that newly activated muscle back into function. This laid out program is only one very brief version of what could possibly be done with each athlete and throughout this article it can be seen there are many benefits of the thrust movement if it is matched to the sport specific activity and trained with proper technique.

Some exercises to consider would be lumbar extension or side plank isometric holds on a roman chair at the gym with the hip pad positioned at different vertebral levels. Then we would progress this exercise by adding in a secondary component related to the sport such as the holds while catching a football, dribbling, shooting. Another exercise that is beneficial for trunk rotational faults would be side step outs without allowing trunk rotation while holding a weighted pulley or band with both upper extremities static at the navel level. You could also trial the static 45 degree hip flexion holds with a theraband around the thighs to promote posterior chain contribution and then add increased weight and lower extremity motions in all planes with the trunk held stable as shown in the accompanying video.

Side plank variations with the lower or upper extremity open chain limbs performing sports specific motions are also great functional exercises to perform that have been shown to maximize trunk activation at minimal spine load. Due to the high demand of some sports it may become important for the athlete to work on core stability with ipsilateral or contralateral lower and upper extremity open and closed chain functional patterns. If they are related to sport specific movements trial neutral spine association or dissociation with crawling, supine frozen bear rolling, bird dog, or dead bug type exercises with possible cable machine, free weight, or theraband resistance attached to upper or lower extremities.  

QUICK LOOK: MOVEMENT

  • Back pad just below inferior border of scapula

  • Padding on bar between bar and ASIS if needed

  • Engage core using cues and proper bracing techniques prior to starting the lift

  • Feet hips distance or slightly wider

  • Knees in line with feet (No femoral adduction on hip drive (adductor dominance), can be cued with thigh band)

  • Start with hip drive as hips push bar straight up

  • Keep forward superior eye gaze

  • Chin tuck sustained for entire motion (No cervical extension as you thrust up)

  • No chest flair as you thrust upwards (Avoid TL junction irritation and hypermobility)

  • Flat torso at top end position (Shoulders in line with the hip and knee)

  • At the top end position maintain neutral spine (No anterior pelvic tilt/ lumbar spine lockout)

Exercise Progression:

  • Hip thrust unweighted

  • Hip thrust with abduction proprioceptive band unweighted

  • Hip thrust with/without abduction band weighted

  • Hip thrust with elastic bands for eccentric load/ Weight differences/ Unstable surface

  • Hip thrust with single leg

Research Quick Reference:

  • Young trained female athletes performing a 10RM barbell hip thrust both dynamically and isometrically will elicited significantly greater mean and peak upper gluteus maximus, lower gluteus maximus, and biceps femoris EMG activity when compared to a back squat. (Select muscle EMG activity greater with barbell hip thrust vs. squat)

  • When testing maximal isometric hip extension torque at 90°, 60°, 30°, and 0° hip flexion angles the gluteus maximus EMG activity is lowest with the hip in 90° of hip flexion and highest with the hip in 0° of hip flexion which correlates more closely to the thrusters line of resistance vs a squat. (Isometric gluteus maximus EMG activity highest with the hip in full extension)

  • When comparing the Barbell, Band, and American hip thrust variations with young trained female athletes performing a 10RM the barbell hip thrust variation showed greater mean gluteus maximus EMG amplitude than the American and Band hip thrust variations, and greater peak gluteus maximus EMG amplitude than the band hip thrust variation. (Pick thruster variations based on targeted EMG muscle activation)

  • When comparing front squat vs. hip thrust training to the sport specific outcomes of vertical jump, horizontal jump, 10m sprint, 20m sprint, hip thrust, and front squat with young athletic males, the vertical jump and 3RM front squat showed greater results from the front squat trained group, and the 10m and 20m sprint times showed greater results form the hip thrust trained group, there was no between group difference in regards to horizontal jump. The hip thrust group showed improvements in the 20-m and 10-m sprint times, 3RM hip thrust strength, 3RM front squat strength, vertical jump, and horizontal jump. (Match training movements using the sport specific force vector theory for best carryover and hip thrust may be a viable alternative training method for conventional squats)

CITATIONS

  1. Contreras, B, Cronin, JB, Schoenfeld, BJ, Nates, RJ, andSonmez, GT. Are all hip extension exercises Created equal? Strength Cond J 35: 17–22, 2013.

  2. Worrell TW, Karst G, Adamczyk D, Moore R, Stanley C, Steimel B, et al. Influence of joint position on electromyographic and torque generation during maximal voluntary isometric contractions of the hamstrings and gluteus maximus muscles. J OrthopSport Phys Ther. 2001;31(12):730-740.

  3. Wakahara T, Fukutani A, Kawakami Y, Yanai T. Nonuniform muscle hypertrophy: its relation to muscle activation in training session. Med Sci Sports Exerc. 2013;45(11):2158–2165.

  4. Wakahara T, Miyamoto N, Sugisaki N, et al. Association between regional differences in muscle activation in one session of resistance exercise and in muscle hypertrophy after resistance training. Eur J Appl Physiol. 2012;112(4):1569–1576

  5. Robertson, DGE, Wilson, JM, and St Pierre, TA. “Lower extremity muscle functions during full squats,” Journal of Applied Biomechanics, vol. 24, no. 4, pp. 333–339, 2008.

  6. Morrissey, MC, Harman, EA, and Johnson, MJ. Resistance training modes: Specificity and effectiveness. Med Sci Sports Exerc 27: 648– 660, 1995.

  7. McAndrew D, Gorelick M, Brown J. Muscles within muscles: a mechanomyographic analysis of muscle segment contractile properties within human gluteus maximus. J Musculoskelet Res. 2006;10(01):23– 35.

  8. Lyons K, Perry J, Gronley JK, Barnes L, Antonelli D. Timing and relative intensity of hip extensor and abductor muscle action during level and stair ambulation. An EMG study. Phys Ther. 1983;63(10):1597– 1605.

  9. Gullett, JC, Tillman, MD, Gutierrez, GM, and Chow, JW. A biomechanical comparison of back and front squats in healthy trained individuals. J Strength Cond Res 23: 284–292, 2008.

  10. Foley, Ryan C.A. et al. “Effects of a band loop on lower extremity muscle activity and kinematics during the barbell squat.” International Journal of Sports Physical Therapy 12.4 (2017): 550–559. Print.

  11. Contreras, Bret. Force Vector Training (FVT). The Glute Guy, 1 July 2010, Bretcontreras.com/load-vector-training-lvt/.

  12. Contreras, B, Cronin, J, and Schoenfeld, B. Barbell hip thrust. Strength Cond J 33: 58–61, 2011.

  13. Contreras, B, Vigotsky, AD, Schoenfeld, BJ, Beardsley, C, and Cronin, JA. Comparison of gluteus maximus, biceps femoris, and vastus lateralis EMG activity in the back squat and barbell hip thrust exercises. J Appl Biomech 31: 452–458, 2015.

  14. Contreras, B, Vigotsky, AD, Schoenfeld, BJ, Beardsley, C, and Cronin, JA. A Comparison of Gluteus Maximus, Biceps Femoris, and Vastus Lateralis Electromyography Amplitude for the Barbell, Band, and American Hip Thrust Variations. Journal of Applied Biomechanics, 32, 254-260, 2016.

  15. Contreras, B, Vigotsky, AD, Schoenfeld, BJ, Beardsley, C, and Cronin, JA. Comparison of gluteus maximus, Biceps Femoris, and Vastus Lateralis EMG amplitude in the parallel, full, and front squat variations in resistance trained females. J Appl Biomech 32: 16–22, 2016.

  16. Contreras, B, Vigotsky, AD, Schoenfeld, BJ, Beardsley, C, McMaster, D, Reyneke, J, and Cronin, J. Effects if a six-week hip thrust Vs. Front Squat resistance training program on performance in adolescent males: A randomized controlled trial. Journal of Strength and Conditioning Research. 31(4)/999–100, 2016.

  17. Contreras, B, Zweifel, MB, Vigotsky, AD, Njororai Simiyu, WW. Effects of 6-week squat, deadlift, or hip thrust training program on speed, power, agility, and strength in experienced lifters: A pilot study. Journal of Trainology 6:13-18, 2017.

Proper Trunk Stability- The Muscular Guide Wires Within

Let’s first start with a definition. Kibler et al., 2006 from the Journal of Sports Medicine, defines Core stability as “the ability to control the position and motion of the trunk over the pelvis to allow optimum production, transfer and control of force and motion to the terminal segment in integrated athletic activities.”

INTRODUCTION

Feedforward subconscious automatic trunk stabilization via core stability is crucial for efficient biomechanical sport specific movements in order to maximize force transmission and minimize joint loads. Core stability is defined most accurately as the “the ability to control the position and motion of the trunk over the pelvis to allow optimum production, transfer, and control of force and motion to the terminal segment in integrated athletic activities” (8).  High-level athletes must be able to transmit force across the body in the most efficient way possible in order to reduce the chance of peripheral muscle overuse and increased athletic performance with the least energy expenditure. In order to achieve this, the athlete must first focus on perfecting the correct core activation patterns while simultaneously achieving optimal breathing patterns demonstrated in last month’s article. Core activation and breathing are the foundation for core stability. We would never train an athlete to sprint before they could walk without faults. We must do the same when treating the core. The goal for core stability with all high-level athletes should be for them to attain subconscious feed forward trunk control and core stability with optimized breathing patterns under stress and fatigue. In this article, I will discuss how to best achieve this through evidence-based core anatomy and physiology, higher level core testing, and sport specific core training progressions.

ANATOMY

Core musculature includes the muscles of the trunk and pelvis that are responsible for the maintenance and stability of the spine and pelvis (8). They help in the generation and transfer of energy from large to small body parts during many sports activities (8). These muscles include the scalenes, deep neck flexors, sternocleidomastoid, pectoralis, intercostals, diaphragm, rectus abdominis, transverse abdominis, internal and external oblique, pelvic floor, quadratus lumborum, and lumbar paraspinals as well as any muscles, which can affect these muscles. The core musculature is needed for force transmission across and through the body segments and in order to keep the trunk rigid when receiving or producing impact force. The diaphragm and pelvic floor, which work in synergy with the oblique’s and transverse abdominis, have also been postulated to be major contributing muscles needed in order to attain true trunk stability and control (6,7). They do this by helping to increase the pressure in the abdominal cavity, otherwise known as intraabdominal pressure, which leads to overall increased trunk stiffness (6,7,14,15). A common misconception is the training program that primarily focuses on specific single abdominal muscle hypertrophy or training these muscles as dynamic extremity prime movers, which can lead to muscle imbalances, fatigue, overuse, and injury.  When we take a deeper look into the posterior superficial trunk muscle histology, especially the thoracic and lumbar erector spinae, we see muscle fiber characteristics that are predominantly large type I (slow twitch) fibers. This provides further evidence that these muscles are preset to perform best in postural isometric endurance and stability, aiding in force transmission and trunk stiffness (13).

Further, when we look at the deep spinal rotators and intertransversarii muscles, we see that these muscles have 4-7 times the muscle spindles as even the next most superficial multifidi muscles and that these muscles are most active with passive motion not active motion. This supports the hypothesis that this layer acts as potential vertebral position sensors or as a proprioceptive system not as prime movers or force generators (14). Due to this common practice of dynamic selective hypertrophy training as the best way for the abdominal muscles to gain true strength and stability it becomes important to shed light on the amount of actual muscle force needed to attain this sought after stability. To further reinforce this point, evidence has shown that muscular endurance is more protective of the spine than absolute strength and surprisingly in order to stiffen the spinal segments we only need up to 10-15% of maximal voluntary contraction for rigorous activity (12,14,15). If that is true then; Is core strength really about absolute strength gained through hypertrophy training? It seems that current evidence would point towards a training program that focuses on training muscular coordination and isometric core endurance. Then working that back into sport specific motions in order to achieve subconscious, feedforward, core stability and passive stiffness with optimized breathing patterns under sport specific stress and fatigue (5). With these principals our athlete can transmit forces at the correct time during the integrated athletic movement.

EVALUATION

After a comprehensive breathing and core activation examination is completed the core musculature should be further evaluated under load and trained based on sport specificity. This can be completed in many ways, but I will focus on static testing which correlates to current evidence and trunk tissue histology and function. One very popular extensor chain muscle endurance test is the Sorensen extension test; due to the original studies’ large population, in depth pre and post-testing criteria, as well as the studies’ 1-year follow-up results. This study showed that low back extension holding times in 30-60 year old males of less than 176 seconds were predictive of low back pain during the next year, whereas a holding time greater than 198 seconds predicted an absence of low back pain (3). Other studies have shown that hold times of less than 58s was associated with a three-fold increase in the risk of low back pain, when compared to a hold time of greater than 104 seconds (12). This test has since been shown in various studies from 2001-2017 to have clinical significance regardless of sex, age, and physical activity level. Due to the difficulty in order to set up and perform the Sorensen test in the clinic and for a home exercise program, another test which has been useful in my practice to test low back and posterior chain static endurance is a static bent over weighted hold. This is done at 45 degrees of hip flexion and slight knee flexion. This static posterior chain test is similar to that of the Sorensen test but in a closed chain isometric standing position, with the trunk at 45-degree angle from the ground, using hip flexion. The best part is the evaluation becomes the treatment and is already setting the athlete up to brace and hold in a functional position. To make up for the lost torque on the trunk muscles and posterior chain due to this test’s 45 degrees hold position vs parallel to the ground in the Sorensen test the patient needs to hold 55.34% their body weight for men and 54.54% their body weight for females, which are standardized trunk to lower extremity anthropomorphic ratios per sex split between two hands. This does mean that grip strength will also play a role in this test but this can be bypassed via wrist straps or other aids. Now I understand there are many more components at play with this version of a closed chain posterior muscular endurance test so feel free to try it and if it is not applicable for your patient or your find other obstacles with this form of testing, fortunately, there are many other tests to use. Please refer the video attachment for how to perform and progress this modified evaluation from static testing into a dynamic treatment, as I am currently in the process of obtaining an IRB in order to prove the correlation of the two evaluation tests.   

For the athletic population, I suggest using Mcgill’s static trunk endurance normative values as they combine the sit up, side plank, and Sorensen extension test to come up with normative cut off values as well as muscle endurance ratios with a younger athletic population (14,15).  Other tests supported by sport-specific function or return to sport evidence that should be considered involving the lower extremity with trunk control would be the lower quarter Y-balance test or for the upper extremity the upper quarter Y- balance test (4). Another test with considerable athletic evidence that incorporates trunk control and upper extremity speed and ballistic motion would be the Closed Kinetic Upper Extremity Test (CKUET) (17,18). One part of higher level core evaluation that is consistently missing in current practice is evaluating the core in these positions or with these tests while the athlete is under systemic or sport specific fatigue then comparing those to normative values or the athletes non-fatigued values. Mcgill describes one version of this with the running population, where the athlete would sprint until fatigued and then hold side plank as long as possible to evaluate and eventually treat fatigue related core impairments (14,15). This concept should be translated into all trunk and body evaluative testing as you would not send a patient with a tibiofemoral pathology back to sport without seeing the quality of their movement when they are both fresh and fatigued for objective proof of complete resolution of contributing movement faults. With fatigue, we see a decrease in position sense/ proprioception of sport-specific central and peripheral joints leading to increased tissue overload and damage. (11,19). Therefore, this is of upmost importance because each high-level athlete must be able to maintain automatic feed-forward core stability and trunk control with optimized breathing patterns while under stress and fatigue.

EXERCISES

The concept of training for sport specific core muscle symmetry and co-contraction are pertinent when thinking of functional trunk exercises. As previously stated, when athletes are training trunk stabilizing muscles as prime movers, in isolation for the majority of the workout, or in ways that overemphasize certain overdeveloped trunk muscle groups we run into huge problems. This type of training can lead to suboptimal movement patterns and compromised central stability. Current evidence and muscular histological studies show that static/ isometric trunk stability exercises/ training programs will both increase cross sectional area as well as increase passive trunk stiffness of the core musculature which will then aid in force transmission, increased trunk stability and control, with reduced pain. (9,10).

Some exercises to consider would be lumbar extension or side plank isometric holds on a roman chair at the gym with the hip pad positioned at different vertebral levels. Then we would progress this exercise by adding in a secondary component related to the sport such as the holds while catching a football, dribbling, shooting. Another exercise that is beneficial for trunk rotational faults would be side step outs without allowing trunk rotation while holding a weighted pulley or band with both upper extremities static at the navel level. You could also trial the static 45 degree hip flexion holds with a theraband around the thighs to promote posterior chain contribution and then add increased weight and lower extremity motions in all planes with the trunk held stable as shown in the accompanying video.

 
Lumbar Extension Isometric Hold

Lumbar Extension Isometric Hold

Side Plank Isometric Hold

Side Plank Isometric Hold

Lateral Step Outs

Lateral Step Outs


Side plank variations with the lower or upper extremity open chain limbs performing sports specific motions are also great functional exercises to perform that have been shown to maximize trunk activation at minimal spine load. Due to the high demand of some sports it may become important for the athlete to work on core stability with ipsilateral or contralateral lower and upper extremity open and closed chain functional patterns. If they are related to sport specific movements trial neutral spine association or dissociation with crawling, supine frozen bear rolling, bird dog, or dead bug type exercises with possible cable machine, free weight, or theraband resistance attached to upper or lower extremities.  

 
Side Plank Isometric Hold

Side Plank Isometric Hold

Dead Bug Static Hold

Dead Bug Static Hold

Dead bug Alternating Arm/Leg Variation

Dead bug Alternating Arm/Leg Variation

Static Bear Crawl

Static Bear Crawl

Bear Position with Perturbation

Bear Position with Perturbation

Bear Crawl

Bear Crawl


Most of these exercises can be progressed with them being performed on unstable surfaces or with external perturbation training but keep in mind as we increase the demand on the trunk we increase the muscular demand and co-contraction and thus can increase the spine load which can be important when treating those athletes with concurrent spinal irritability, so progress slowly and with purpose. Also, keep in mind that it has been shown that there is no single core exercise that challenges every abdominal muscle at the same time, therefore we must pick a multitude of exercises that are most sport specific each session in order to fully optimize core stability and coordination (2). During the same training session, after priming the trunk with specific activation, strength, and coordination exercises, incorporate sports related functional movements with the athlete focusing on conscious timing of the trunk muscles. This can be done prior to and during limb movement and then progress them towards attaining an automatic subconscious activation pattern of proximal stability prior to and during these movements. Also spend time on correct sport specific movement patterning, paying close attention to shoulder, hip, and trunk association or disassociation while still having a baseline of passive automatic feedforward trunk stability and control. Next try all of these under local muscle or cardiovascular fatigue in order to test core stability and coordination with increased diaphragmatic demand.

If we put it all together, one possible version of a graded progressive treatment protocol for the trunk would focus on breathing with core activation and timing while accepting the weight of lower and upper extremities in supine, sitting, and standing. Then core isometric training, working towards evidence-based normative values progressed with sport specific motions (14). Concurrently or after this phase focusing on conscious to unconscious automatic timing and activation of the core musculature with corrected sport-specific movements. Finally, work on all of these concepts under fatigue, on unstable surfaces, or with perturbations in order to achieve the most beneficial sport specific stability possible.

I hope this article shed light on the importance of automatic proximal stability before and during distal mobility through evidence-based static and functional core training for all integrated athletic movements and that from these tests and sample treatment examples we can further progress each athlete to stabilize and efficiently transmit force in order to reduce proximal or distal tissue injury and fully optimize each athlete.
 

EVALUATION REFERENCE SHEET

Isometric Trunk Tests:

Side Plank Right: >=83 sec

Side Plank Left: >=86 sec

Side Plank Right/ Left Endurance Ratio: <.05 seconds Difference

Flexor Endurance Test: >=134 sec

Extensor Endurance Test: >=173 sec

Flexion/ Extension Endurance Ratio: <1.0 seconds Difference

Side Plank/ Extension Endurance Ratio: <.75 seconds Difference

Upper Quarter Y-Balance Test:

High school male and female baseball/ softball players: Use for R to L differences, No difference between throwing and non-throwing arm

Lower Quarter Y-Balance Test:

 > 4cm anterior – 2.5x greater risk

 Composite score < 94% - 6.5x greater risk

CKCUEST Test:

Collegiate Male Baseball players: Normative mean value is 30 touches

Collegiate Football players: Cut off value of less than 21 touches could identify athletes at risk for future injury  

CITATIONS

  1. Anderson, David; Barthelemy, Lindsay; Gmach, Rachel; and Posey, Breanna, "Core Strength Testing: Developing Normative Data for three Clinical Tests" (2013). Doctor of Physical therapy Research Papers. Paper 21.

  2. Axler, C.T. and McGill, S.M. (1997) Low back loads over a variety of abdominal exercises: Searching for the safest abdominal challenge. Medicine and Science in Sports and Exercise, 29, 804-811.

  3. Biering-Sørensen F. Physical measurements as risk indicators for low-back trouble over a one-year period. Spine (Phila Pa 1976) 1984 Mar;9(2):106–19.

  4. Butler, Robert J. et al. “Bilateral differences in the upper quarter function of high school ages baseball and softball players.” International Journal of Sports Physical Therapy 9.4 (2014): 518–524. Print.

  5. Cholewicki J, Juluru K, McGill SM, et al. Intra-abdominal pressure mechanism for stabilizing the lumbar spine. J Biomech 1999; 32 (1): 13-6: 76-87

  6. Hodges PW, Richardson CA. Contraction of the abdominal muscles associated with movement of the lower limb. Phys Ther. 1997;77(2):132-144.

  7. Hodges, P W et al. “Contraction of the Human Diaphragm during Rapid Postural Adjustments.” The Journal of Physiology 505.Pt 2 (1997): 539–548. Print.

  8. Kibler WB, Press J, Sciascia A. The role of core stability in athletic function. Sports Med 2006; 36(3): 189-98.

  9. Kim S, Kim H, Chung J. Effects of spinal stabilization exercise on the cross- sectional areas of the lumbar multifidus and psoas major muscles, pain intensity, and lumbar muscle strength of patients with degenerative disc disease. J Phys Ther Sci. 2014;26(4):579–82.

  10. Lee BC. et al. “Effect of long-term isometric training on core/torso stiffness.” Journal of strength and conditioning research.(2015) Jun;29(6):1515-26.

  11. Lee, Hung-Maan et al. Evaluation of shoulder proprioception following muscle fatigue. Clinical Biomechanics , Volume 18 , Issue 9 , 843 – 847. 2003.

  12. Luoto S, Heliovaara M, Hurri H, Alaranta H. Static back endurance and the risk of low-back pain. Clin Biomech (Bristol, Avon) 1995;10: 323–4.

  13. Mannion AF et al. Muscle fibre size and type distribution in thoracic and lumbar regions of erector spinae in healthy subjects without low back pain: normal values and sex differences. Journal of Anatomy. 1997;190(Pt 4):505-513.

  14. McGill, Stuart. Low Back Disorders: Evidence-based Prevention and Rehabilitation. Champaign, IL: Human Kinetics, 2002. Print.

  15. McGill, Stuart. Ultimate Back Fitness and Performance Fourth Edition .Waterloo, Ontario Canada, 2009. Print.

  16. Page, Phillip, et al. Assessment and treatment of muscle imbalance: the Janda approach. Human Kinetics, 2010.

  17. Pontillo M, Spinelli BA, Sennett BJ. Prediction of in-season shoulder injury from preseason testing in division I collegiate football players. Sports Health. 2014;6(6):497-503.

  18. Roush, James R., Jared Kitamura, and Michael Chad Waits. “Reference Values for the Closed Kinetic Chain Upper Extremity Stability Test (CKCUEST) for Collegiate Baseball Players.” North American Journal of Sports Physical Therapy : NAJSPT 2.3 (2007): 159–163. Print.

  19. Tripp, Brady L, Eric M Yochem, and Timothy L Uhl. “Functional Fatigue and Upper Extremity Sensorimotor System Acuity in Baseball Athletes.” Journal of Athletic Training 42.1 (2007): 90–98. Print.

  20. Wainner RS, Whitman JM, Cleland JA, Flynn TW. Regional interdependence: a musculoskeletal examination model whose time has come. J Orthop Sports Phys Ther.2007;37(11):658–60